WidenersInline FabricationSnyders JerkyRepackbox
Load DataMidSouth Shooters SupplyRotoMetals2Reloading Everything
Lee Precision Titan Reloading
Results 1 to 9 of 9

Thread: Repairing a Plastic Butt Plate. (Ever done it like this?)

  1. #1
    Boolit Buddy
    Join Date
    Jul 2011
    Posts
    188

    Repairing a Plastic Butt Plate. (Ever done it like this?)

    Here's one you might not do regularly, or one that you might not even care to do at all...

    I picked up a Marlin 122 Auto-Safe .22 at a pawn shop the other day, and it was in ROUGH shape. I am fixing and repairing all the problems with it right now, but IF I'm able to sell afterwards, I should have a couple extra bucks on the side.

    Here's the gig-- Plastic butt plate, right? Previous owner treated this rifle like a canoe paddle or a baseball bat, so the bottom corner of the butt plate is broken off and missing. I was entertaining thoughts of just buying a new one, but why drive up my costs on repair when I can do it at home? So I did! I'll give details at each picture...

    (this is a teaser, because I have WAY MORE pictures of the rest of the job coming after the stock is done...)


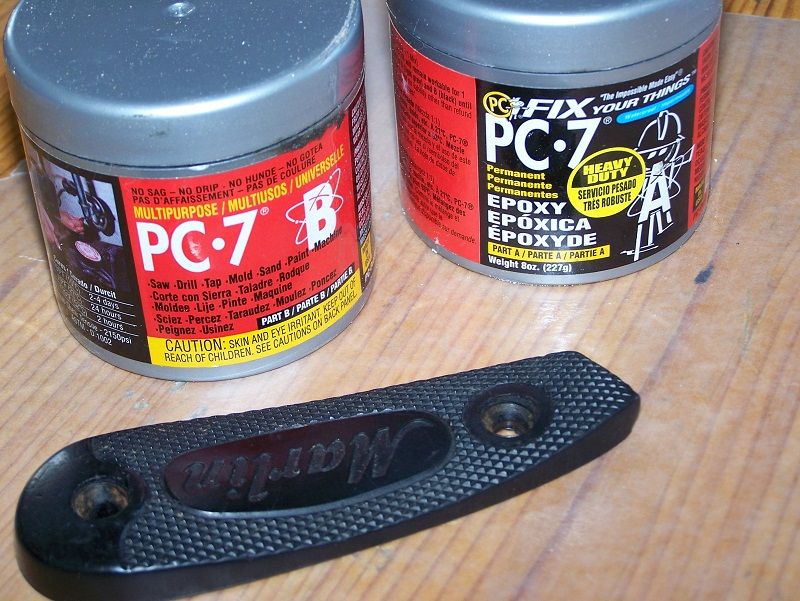
    Here's what it looked like when I got it. Clearly broken. A blind man would know that something was missing... Last year I bought the PC-7 cement, and it's pretty awesome stuff. One word of advice-- DO NOT, under ANY condition try to use this as a bedding agent. Don't ask me how I know this... However, it does make a wonderful all-purpose body repair for stuff like plastic butt plates.


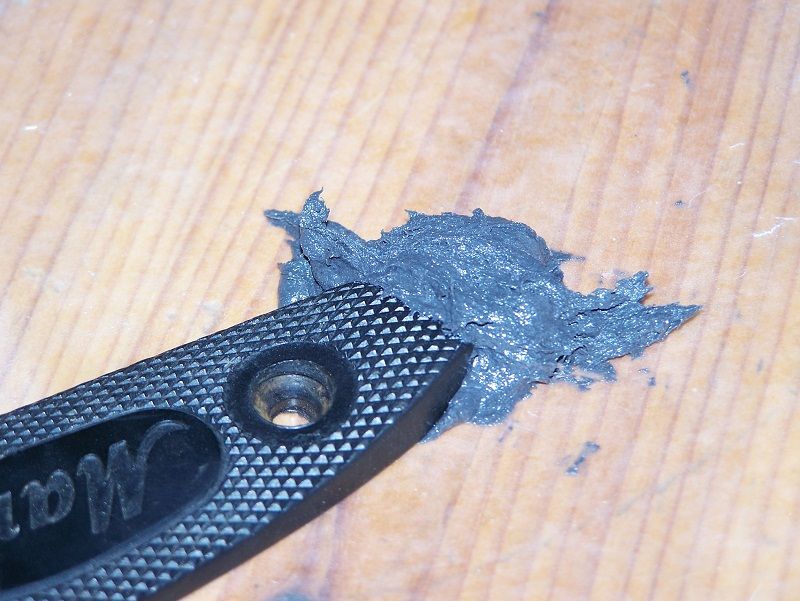
    The PC-7 is goopy as all get out, but that's good in the way that it STAYS where you put it, and it won't "melt" all over the place if you are trying to make a form out of it. I just mixed it up and sort of smushed it against the broken portion. I did some cleaning and roughing-up of the area where I wanted the cement to bond, and then I set it up in the furnace room. PC-7 takes a long time to fully cure, but after a few hours it is still soft enough to carve at with a razor blade or clip it with some flush-cutting trimmers without the whole thing shattering or cracking.


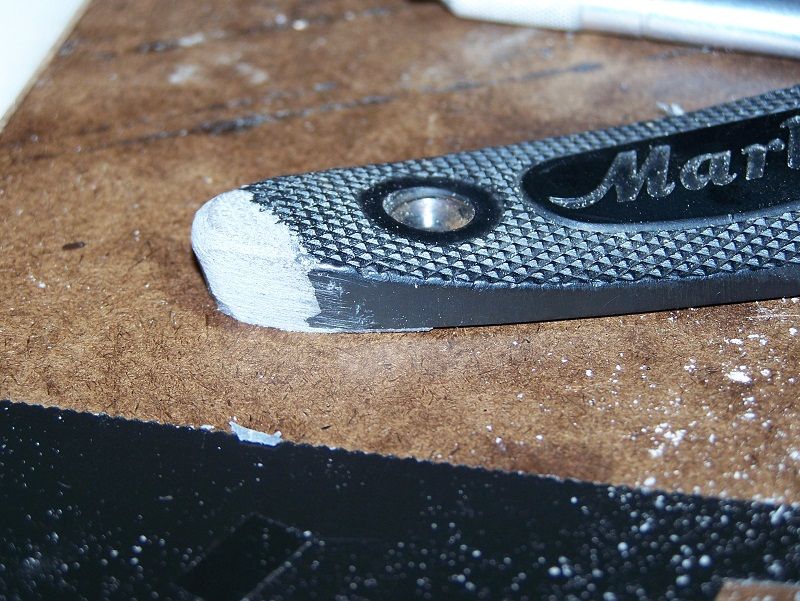
    Here it as after trimming off all the excess. I used 60 grit sandpaper after trimming away the largest portions. I used the plastic spacer, the thing that goes between the butt plate and the stock, as an outline, and then used 320 grit sand paper for final touches.


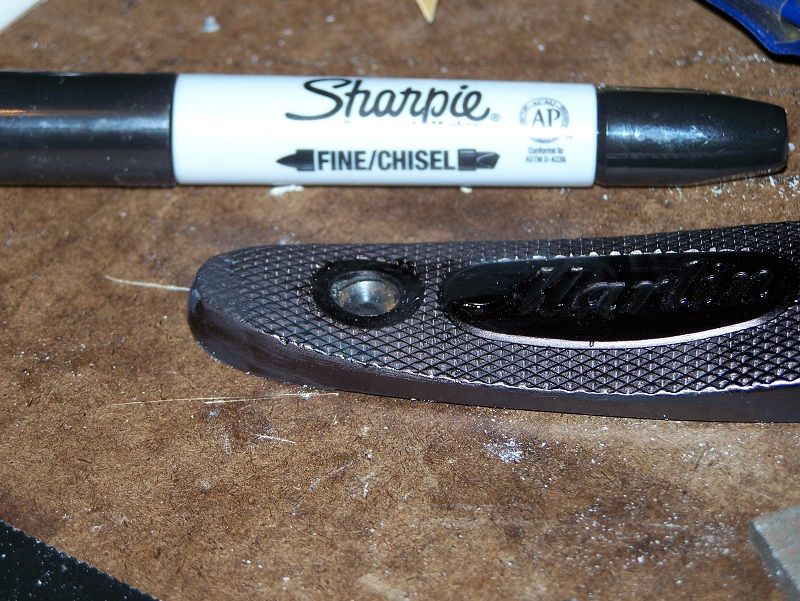
    Next, I needed to replace the checkering. I used a set of Swiss Files for this and guided myself off of the existing pattern. After checkering was completed, I touched it all up with a sharpie permanent marker to fix the color shade.

  2. #2
    Boolit Master

    xs11jack's Avatar
    Join Date
    Apr 2012
    Location
    O'Fallon, Mo.
    Posts
    1,130
    That really looks good! About the time to set of the PC7, I was told by an oldtimer I respect that the best epoxy takes the longest to set up. That 5 minute stuff is a waste.
    Jack
    "'Necesity' is the plea for every infringement of human freedom. It is the argument of Tyrants: it is the creed of slaves."
    William Pitt, 1783
    "America will never be destroyed from the outside. If we faulter and lose our freedoms, it will be because we destroyed ourselves." Abraham Lincoln.

  3. #3
    Boolit Buddy
    andremajic's Avatar
    Join Date
    Jan 2008
    Location
    Alabama
    Posts
    467
    Another tip for epoxy. If you want to stain it a certain color you can mix in some powder coat. I picked up a can of black last time at Harbor freight for mixing with epoxy to fill in the pores of wood. Add a small scoop (1/4 tsp) to a small batch of epoxy, and "fold it in" well with a spatula.

    You could probably also use toner from a printer. That stuff is as fine as powdercoat powder so it would mix in well and bonds with heat.

    Use gloves to hand rub it in to the wood. When cured, it's jet black, and you can sand the excess away. It's a cheap way to bring out the figure of your "plain" walnut. Also fills in the pores the first coat.

    I used this trick to stain the epoxy that I was using to repair a bunch of missing material from a black HS precision stock. Works great!

    The old gunsmith "kink" said to use ebony dust, but seems like a waste with the cost of ebony, unless you're using it all the time.

    Comes in a lot of colors, and it's cheap for a small container of it. Probably enough to last a lifetime in one of those cans.
    Last edited by andremajic; 02-05-2013 at 08:22 PM.
    Check out my vendors section:
    http://castboolits.gunloads.com/forumdisplay.php?231-Andy-s-Slow-Rust-Blue

    "As democracy is perfected, the office of the President represents, more and more closely, the inner soul of the people. On some great and glorious day, the plain folks of the land will reach their heart's desire at last and the White House will be occupied by a downright fool and complete narcissistic moron."
    H.L. Mencken

  4. #4
    Boolit Buddy
    Join Date
    Jul 2011
    Posts
    188
    andremajic- Thanks for the tip, I'll keep it in mind for next time!

  5. #5
    Boolit Master


    Walter Laich's Avatar
    Join Date
    Aug 2005
    Location
    Cypress, Republic of Texas
    Posts
    3,502
    Great job--will need to remember this method
    NRA Life
    USPSA L1314
    SASS Life 48747
    RVN/Cambodia War Games, 2nd Place

  6. #6
    Boolit Buddy
    Join Date
    Jan 2008
    Posts
    353
    "...You could probably also use toner from a printer. That stuff is as fine as powdercoat powder so it would mix in well and bonds with heat..."

    That's exactly what I use. Works perfectly for repairing black butt plates, grip caps and pistol grips.
    I use one of the Brownells bedding epoxy compounds, but only because I have it handy and use it all the time.
    Most any decent epoxy mix will do.

    You can save some time & headaches repairing a butt plate break like that by doing the repair right on the stock if you're not going to be refinishing the wood on a project.

    Clean the butt plate break so there's no old glue, dirt ect on the broken edge.
    Take a piece of saran wrap, and place it on the face of the butt of the stock so it covers the wood where the plate is missing.

    Mount the plate back on the stock.

    Now pull the saran wrap down over the stock itself tight enough to leave the wrap that's on the facing of the wood nice & tight w/o any wrinkles.

    Tape it there with a couple or three tiny dots of masking tape. You won't need much.

    Then take a piece of thin cardboard,,like someones business card you don't like, and wrap that around the toe of the stock to form a mould for the out side contour of the missing piece of butt plate.
    Tape that into place the same way as above. Even a rubber band around the entire back end of the stock will hold it in position and seal it for the next step.
    If you want,,put a light coating of wax on the inside of the carboard before installing to make the end result easier to work with..

    Don't be concerned with the top of the cardboard mould being level with the existing butt plate. What you want is this mould you've just built to cast the new piece into position to fit the flat (or curved) contour of the wood,,match the toe line contour of the stock exactly and bond perfectly with the old piece.

    The only extra work you'll have to do is some contour work to the outer surface to match it to the old piece.
    Leave the newly poured piece a bit higher than the old so you have some to work with. A file removes it in a few seconds.

    Mix up your epoxy w/colorant. Slowly pour it into the mould. Avoid air bubbles and pockets by pouring it in in a steady slow uninterupted stream in the center of the mould letting it spread accross the mould on it's own and filling it up.

    Let it cure and remove the cardboard.
    Unscrew the now one piece butt plate. The saran wrap should make it detach easily from the wood. The wrap may stick a bit to the fibreglass, but can be pulled off easy enough if there were no wrinkles in it to bind up into the epoxy.
    Reinstall and file the top of the new plate to shape.
    Polish down to 600 or 800. Then go to 0000 steel wool.

    Sounds like a lot,,but it doesn't really take much time.
    If you're not refinishing the wood,,just repairing a broken butt plate, it makes it a lot easier to do than trying to file the sides & toe line to shape w/o damaging the wood finish. Gets you a nice clean fit.

  7. #7
    Boolit Master brstevns's Avatar
    Join Date
    Oct 2007
    Location
    MO
    Posts
    3,358
    I have done this using JB Weld. Can make it a little darker are black by added just a touch of the hobby acrylic paint.

  8. #8
    Boolit Grand Master

    Join Date
    May 2005
    Location
    Castlegar, B.C., Canada
    Posts
    7,954
    Now there are a couple of real good ideas I better "borrow" and file away. Nice job and great ideas!

    Longbow

  9. #9
    Boolit Buddy
    Join Date
    Jan 2012
    Posts
    104
    Great work

Posting Permissions

  • You may not post new threads
  • You may not post replies
  • You may not post attachments
  • You may not edit your posts
  •  
Abbreviations used in Reloading

BP Bronze Point IMR Improved Military Rifle PTD Pointed
BR Bench Rest M Magnum RN Round Nose
BT Boat Tail PL Power-Lokt SP Soft Point
C Compressed Charge PR Primer SPCL Soft Point "Core-Lokt"
HP Hollow Point PSPCL Pointed Soft Point "Core Lokt" C.O.L. Cartridge Overall Length
PSP Pointed Soft Point Spz Spitzer Point SBT Spitzer Boat Tail
LRN Lead Round Nose LWC Lead Wad Cutter LSWC Lead Semi Wad Cutter
GC Gas Check